Wednesday, August 22, 2012

Count Your Blessings

(yeah I mixed up the 9 and 10)

This is one of the pages I copied from the pattern book my mom bought back in the 70's. This was one of my quiet book originals. When I was making this page, I used an inkjet printer with a copy option. I folded over my pellon to fit the paper size (my book is about an inch too wide to fit) then I just copied. It was a black outline so I colored the pieces, etc and then fused the pieces together with wonder under and used little fusible velcro pieces to attach the pieces. Pretty easy page to do, just printing, coloring, cutting and ironing.


Nativity


This is another copy, color cut iron page. This is from my moms 70's pattern book. There was another page with a Bible. The Bible had a zipper on the page side that opened to a pocket for the pieces. That required more work... I wanted to cut out as many steps as possible (as well as using more pellon than I needed to). I decided to just print off the stable page, then I ironed a piece of fusible pellon the size of the stable on the back side of the page where the stable was. I made another piece that was slightly larger than the stable with non fusible pellon. I pinned in on and stitched from the front around the stable. I then made a slit across (you can see the slit in the picture) so it made a pocket for the pieces. The pieces I just colored and made thicker with fusible pellon. Another classic page for me to remember my past (and much faster than if I were to have come up with the idea start to finish).

Priesthood Keys

My dear Mother said we played with this a lot
I made this in a similar fashion to the other pattern book pages. I copied the page and pieces. Then I ironed a square of pellon on the back of the key hole parts, then cut out the hole.I then put pellon on the back to make a pocket (I will have to think how I did that exactly. I think I put squares on another page where the holes would be and then ironed it).  I stiffened the keys with pelltec because they get a lot of use, and found a cute ring to put them on (can office supplies be called cute?) Later I found someone had decided it needed a little pink added. In the original it had a strap with a buckle where the pink is, but I didn't have one on hand so it was put on the to do list.

Tuesday, August 21, 2012

Noah's Ark, as printed from the pattern


This was a page my mom made back in the day, and I had to do, even though I had another one.. because of how easy it was. I copied the picture onto pellon from the pattern book, then copied the animals and ironed then to thicker pellon. (My kids helped me color these animals since they wanted to help with them for long enough.) I made the pocket similar to the nativity page by ironing on pellon onto the back and then sewing around the boat after I pinned on a backing to act as a pocket.

Treasures for a Happy Life with treasure map


Once again, another pattern print with the treasure box and pieces (you can see this was my first one I tried from the copying the pattern to pellon technique, I forgot to cover the instruction letters). I decided to do this pretty much like the instructions on the chest (sewing it onto the page), but it had a  small lock and key, which I didn't have, so I just made it a little different. My kids think that treasure maps are cool so I added a treasure map to a happy life. I got to learn and practice the technique of the eyelet-ing with the treasure pieces (there were quite a few). There was some writing on the pattern page, but for convinced I left it off. It said "treasures of a happy life". These were fun pages to make because they were fairly straight forward and pretty simple.

Monday, August 20, 2012

My first pages from long ago...

So, upon opening my quiet book box from long ago I found some pages that I had started to make. When my husband brought home a bunch of upholstery samples from his work, my first thought was quiet book. This was my initial idea for a layout. Looking back I realized that size was an issue. The size of the pieces were about 7x10. This was small for my bigger ideas, but it worked great for a few pages.
These ideas were from the first quiet book my mom made, a preschool type age book. I came up with the patterns myself.  I admit the snowman idea came from a neighbors quiet book I saw next to me at church, back in the day. The book was probably available at Deseret Book at the time, or something like that (maybe still is). So, in case you wanted an explanation. (and some bad pictures:)) here we go for the first pages I made for my quiet bible (as my brother calls it).


 The snowman was snapped in the original book. I thought I would make it more movable (aka. lose-able), and cut out individual pieces. I used three different sized cups to trace circles, then free handed a hat, scarf, arms, buttons, nose, and eyes. I made a little bag to hold all the pieces and wrote, "Once There Was A Snowman" in case my children couldn't make out what it was supposed to be. The blue background was a micro suede remnant that doubled as a good felt board.

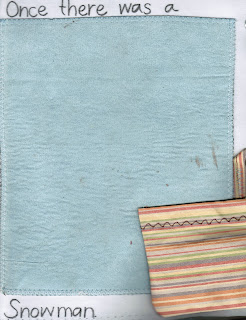
Once there was a snowman with bag
leather cut out pieces of snowman from bag

I had seen a cute little tree somewhere online, and thought I would try to replicate it. I cut out the tree, trunk, 7 apple pieces, 7 orange pieces and a basket looking square.  I initially tried craft glue, then a glue gun to glue the zelcro to the tree and pieces. Those didn't last long, recently I found this amazing stuff called fusible velcro, seems to work and I didn't have to sew the leather. (the leather did get a little too much heat on some on the apples. woops.) I used craft glue to glue the tree and trunk to the fabric, now I have learned the value of wonder under, or fusible pellon. Those things sure make sewing these things easier.
Tree with apples and oranges (not biology class approved)


 I had to make the classic: tic tac toe. My older kid actually like this one. I just set a narrow zig zag, made the lines and then cut out the leather shapes and made a nifty pocket.

a used version of tic tac toe

The flower pot I cut out fabric for the pot (I should have put fusible pellon on the back or wonder under-ed it to the page). Then before I sewed the pot on I made a small zig-zag stitch for the stem and leaves. The flowers are leather with pellon fused to the back, a slit for the button.

The barn I started to make and had a few hiccups. I didn't Google much back when I was creating it, but now there are a wealth of patterns for a barn quiet book (at least it looks like it on Pinterest). I originally found a sticker page of animals, stuck them to paper, cut them out and put contact paper on them. Those pieces got lost in moves and so I made a one finger puppet to replace them, I probably will make more later.

my barn with a solitary chick


So, like I said these were, for the most part, ideas from my moms first quiet book, or the internet that I made on smaller pieces, then I sewed them onto larger pieces of pellon to match the other pages I later made.

Modern Day Prophet and Apostles

I had these pictures and names cut out from a kids conference packet a while ago. When I was laminating some other pictures I had extra space, so I laminated these. I found some old vinyl, cut out four strips, folded up the bottom and zig zagged across the bottom, then sewed a straight stitch in between each picture. That made it so I had a pocket for the name and one for the picture. (I only plan on the pictures really coming out often. I made the names interchangeable in case I needed to switch it around in the future.)