Thursday, August 23, 2012

Pages that are still being created.....

These pages are ones I am working on, but still haven't figured out how exactly to complete them. I'll update this when I do.
Doctor Doll


Mr.  Anatomy man
I started this doll so my kids could put bandaids and such on the guy to help him feel better. Well, it took off from there. I thought of the organs, then I found a blog that helped me to make the organs doll like (her doll was much bigger though). I have yet to figure out what kind of a face to put on him, how to make it into a page now
All his parts outside
plan of salvation
plan of salvation

Children from around the world

Bible with pocket on side for figures
Bible prophets to go in pocket (image source)


My Family's Preach My Gospel Quiet Book Swap

After I had started to make many of my ideas I came to a realization, for the amount of pages I had planned, it was going to take more of my life away than I really wanted. I hadn't even dented the preach my gospel theme.  The only thing to do was to call in the help of my family. I had topics I wanted make pages about, but like other pages I did, I didn't know exactly what I wanted, and that's the part that takes me a long time.
Luckily I have five wonderful family members that have creativity (and kindness toward me), so I got them to on board the insanity train.
If you are wondering what these pages are all about on an adult level, you can read more of the basics on mormon.org, or for the actual Preach My Gospel manual and lesson booklets, you can find it on this lds.org link.
The pages we decided to do were:
Lesson 1, Word of Wisdom, washing machine
These were the ones I decided to do. I was going to do the Healthy Eating/Word of Wisdom page, Lesson 1 (still in the works), and the washing machine (I gave most of them the kitchen one, cut out, for them to sew themselves. I am that nice like that, i got tired). 


Family/ Temples, Prayer
My mom did temples and family history, and they prayer. I was impressed with her end results. I would have not taken on the five generations, but my mom wanted her grand kids to know her grandparents names.I was  the ones printing the pages onto the fabric for her, and there was a miscommunication. She said later she wished the temple page was on white (woops, my fault). For the prayer page my mom wanted to do something with a glove, (she almost didn't that's why the girl is there, then at last she changed her mind) my kids love to fit their hand in the little glove. After helping her cutting out and printing her pages I was glad I didn't have to come up with the idea, and sew them.
My mom's families and temple pages
five generations

Law of Chastity, Sleep/Schedule
For the Law of Chastity my sister and I tried to think of an idea that would be childlike,  so we took the "be clean" literally and made a bathtub. The schedule idea I came up with was a bit daunting, so my sister simplified with a clock... much better idea. For my sisters house pages, we used little magnetic dolls that came with clothes, for the people (my mom found these for our kids one Christmas). With the kitchen, bathroom, laundry and bedroom, we pretty much made the basics of a doll house quiet book (who needs a living room, right?).


pages in the works:

Lesson 3, Iron Rod

Ten Commandments, Keep the Sabbath Day Holy

Lesson 4, Tithing

Noah's Ark, the discovery of printing on pellon


Well, this page was created as an experiment. I found this image on the LDS website somehow and it was colored and everything. I decided it couldn't hurt anything to try to print it directly onto fusible pellon. (don't try it in a laser printer, just believe me, I may or may not have tried it, and gummed up a hot roller with fusible material- I am gun shy to try non-fusible pellon) I cut the pellon to the same size as a paper and sent it through. It worked marvelously. I then ironed on the ark to a piece of leather (pelltec or any other thick material would work) and sewed the ark to the page. The animals that were in front of the ark just stayed there because I couldn't cut them without comprimising the ark. The other animals I ironed onto a fleece fabric I had (like those tie blankets are made out of) and then cut them out. By far the easiest page I made, and I think it serves it's purpose great!

Jonah and the Whale, Fishers of Men

I have seen quite a few of these pages that are done way cute. I added scriptures from Jonah on the top of the page by printing on pellon and ironing them on. I did think the shimmery remnant fabric gave it a fun flare. There is also a finger puppet of Jonah and some fish to go in his mouth.

I wanted to use the Fishers of Men scriptures in Matthew as the base of a fishing page. The logistics of this page were not clicking with this page until I found some good instructions for a pole and the fish at this cute quiet book post.  I didn't know which fish his apostles fished for, so I just found some native to my state, and some from Alaska. My nieces and nephews thought this was a fun enough concept to spend a whole afternoon trying to catch them with a long pole and magnets from the fridge. 


Color Wheel, Coloring Pocket, Oragami

I initially wanted to do a color wheel with shapes, but I decided I would print this one with my parents inkjet printer. It was a quick way to do a color wheel page, and the pocket is to hold art stuffs.
The dark pocket page is to hold origami paper and instruction pages. This page was pretty darn simple, yet one of the most used. I just searched for simple origami instructions and printed out the ones that looked on our level. 

The last page is a crayon holder and a pocket I had ABC stamps, and a separate stamp pad I found at Walmart for a dollar each.


Bedroom,,,


I was trying to think of how to use the washer page and make it useful. Well, what better than to make dolls that have clothes that need washing. I had printed these dolls years ago, (with a CD that came with a long gone ink jet printer) as an experiment, and pasted them to a leather piece. When I thought of this page I peeled them off, ironed them on pelltec pellon, and of course added appropriate hair. I cut out the dresser as a pocket for clothes and ironed on the drawers and handles with wonder under.

This was a cute page my sister made for our quiet book swap. It has a cute clock, with movable hands, a bed, and a night stand that has a slight pocket for the top so you can add a book to read (ours is currently missing. I should have taken the advice of my sister and sewed a ribbon to it. She obviously has made a quiet book before). She also had a pocket to go with it for clothes but she gave it to me as an afterthought, and I haven't put it on yet. 

Wednesday, August 22, 2012

The Bathroom....


These were actually from my sister for our family quiet book swap, but I thought since I helped make the pattern and cut them out (and I sewed these since she had a week old baby). The idea originated from the dollhouse quiet book I mentioned on the kitchen page post, but we changed it to fit our needs. We made the tub so it could fit the dolls we had standing up, that way we could make it all on one page. (I guess I could add a shower head somehow... nah). My sister made a cute soap, brush, toothbrush and toothpaste to go into the cupboard pocket. My kids love those pieces the best (and of coarse making flushing sounds in the most inopportune times).


Plant a Garden...


The Prophet said to plant a garden, so that's what I did.... :) In an effort to make a self reliance, "Plant a Garden" type page I thought through all sorts of possibilities, but the logistics weren't there. Then I saw a cute book someone made from a pattern they bought. I can't find a good link to it but it had ten pockets numbered 1-10 and carrots numbered 1-10. The object was to match the numbered carrots to their pockets. I saw that, and there was my solution, pockets. So, this page was sketched out. 
When we planted my parents garden, I looked through the left over seeds and found seeds I could possibly use for these (and draw so a kid could figure out what I had drawn). This is what I came up with. I am sure there are a lot of ways to make this page better, but I only had a short time with the seeds, so time was not on my side. I had to work with the circumstances. 


The fronts of the seed packets

All the cute little seeds

The fronts 

And seeds


Tithing(Charity), Saving, Spending, Buying


This page was one off those pages I drew up, knew the concepts I wanted, put a lot of thought into, but it took me a while to put it all on fabric. So the features I wanted was a tithing envelope to put the 10% in, a piggy bank, (for savings) and a wallet for spending. I still want to write some explanations on the actual page for my kids, but that is still in the thought process. My favorite part of the page is the piggy bank. I made a button hole like slit at the top, then at the bottom I sewed velcro so that they could get the money out like an old fashioned piggy bank. (I thought it was clever). 
I had actually made a wallet, but it was just to big for what I had in mind, so I cut it down to just the pocket. Then I had to have a place to use the money. What good is money if you can't use it right? so I tried to make the store as simple as I could with the concepts I wanted. The items to purchase in the window use each coin type (penny, nickel, dime, quarter) and then you can flip them over to have a more challenging money experience (like $.99) I wanted to put a jar to have actual things in also, like stickers and such, so hence why there is a jar. My favorite part of this page is the cash register I found a picture online, printed it on the pellon and then reprinted the drawer front and sewed on the sliding drawer part to it. I put for pockets, one for each coin type.
the open cash register
The quiet book store, my original idea


Superhero capes

Our neighbors invited us over for dinner the other day and their son had a superhero cape that was reversible. My son requested one, so I made a Superman/Batman one. Then my daughter requested one. So, I asked my husband what he thought of a bat girl and super girl. He said I needed to find real girl superheros with capes. He did a quick search.
As a side note, my kids found out about She-ra and He-man one day on a cartoon spree at grandmas. They thought that 80's cartoon was the coolest. That being said, my husband thought that She-ra was a good fit (and she had a cape) and then a partner to Batman and Superman, Wonder Woman. I didn't know much about either before, but I did my own searching and these are the end result of his suggestions. My picture skills, nor my camera, are what one would call professional, but I thought that it was funny enough to share.
Wonder Woman

with her simplified cape

She-ra

and a pink cape, not the accurate red, but pink is more accepted around here


Eating Healthy....

kitchen for food
I mentioned in a previous post that I initially had made a quiet book in my mind and drew it up right after I was married. I had ideas based upon a theme of teaching self reliance, gospel principles, and a few play pages. I was impressed when I found my old plans. I actually used to think about things. When I saw these plans I felt I owed it to myself to actually make the pages into reality. I hadn't seen the quiet book of my youth since I was little so I came up with my own designs and memory. One of the pages I liked was titled, "Keep Sammy Healthy." This page taught how to choose healthy food as suggested in the Word of Wisdom. This was actually simple in the original book, but I complicated it to meet my desires of teaching more about food and healthy eating.
In searching the web I ran across the cutest quiet book pattern that was selling on etsy, a doll house quiet book. I took the original daisy lane portable dollhouse pattern idea for the kitchen I was thinking, and replicated the idea to have places to hold the food that I drew up for my new, "Healthy Sam" to eat and added a pocket on the bottom to hold the excess food I made.
I was thinking up these page ideas before MyPlate.gov came out. I wanted to help my kids learn about a complete healthy meal. I found an image of the plate on MyPlate.gov and also some ideas for food there. I printed the plate the size I wanted and cut the coordinating color of leather. I also cut out card stock colors to match. This page did take me a while, I admit, but the overall ideas

came together. The garbage was also a must so they could throw away things that were not healthy for our bodies.
I got a little carried away with adding embroidery thread for hair and other little details, but I like overall how it turned out. Does it teach my kids everything I wanted them to learn? I am not quite sure, but my kids sure love stuffing the guy full (overeating may be my concern now).
I did make a girl and a boy one with different  kitchens so my kids didn't fight. That is why there is a Healthy Samantha also (she reminds me of mad madam mim on Sword in the Stone).


In case there is anyone that would like to make this, (because I don't think I would want to make this over and over again), I thought I would scan some pieces I have cut out for my sister, that way you could see the pieces I have and print them and use them as a pattern. These images, if you print them as full page images, should be the size I have been using.
the person pattern, add a zipper, hair and eyes, wala!
Some of the foods I drew for the page

my pattern template for the foods (to draw)


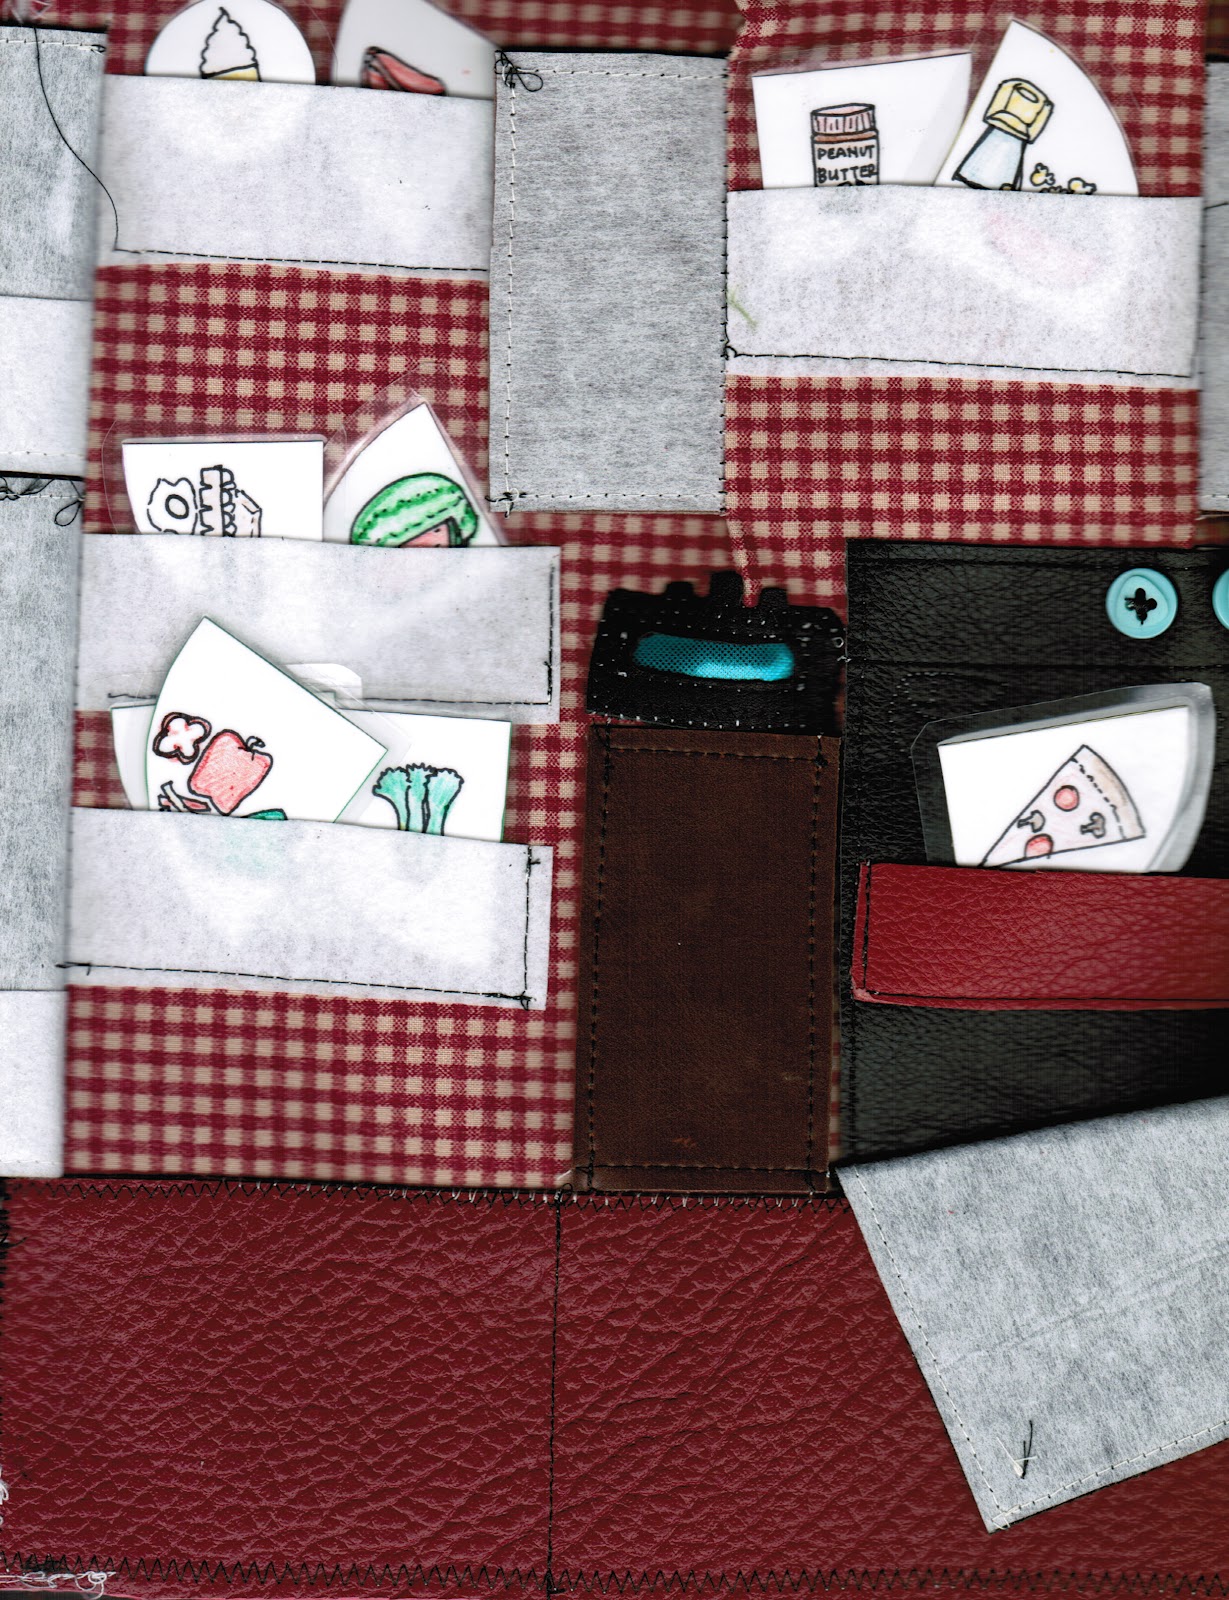
The pattern for the oven is on the left and
 the fridge is on the right. The door for the
cupboard  are on the bottom

This is the plate.  I used wonder
 under to keep the colors on,
then I will stitch around them


Sorting and washing clothes...

Back in the day (about 6 years ago), when I was thinking of ways to teach my future children to do all the things I struggle with, and teach them self reliance, I thought of laundry. I wanted to teach color sorting along with it. I drew up plans for a washer and sorting baskets. Initially I was trying to put them on small pages and it didn't quiet work out. When I readdressed the plans recently I found my old cut outs and decided the increased page size would help my out, so I gave it a try. I also recently saw a cute version of this on imagineourlife and she does an amazing stitching job on her various, amazing pages. As for me I stick to the sewing machine.
If you would like to make a page and want a simple pattern here you go. The washer and baskets are much easier to sew if you iron on a heavy duty fusible interfacing to the back side. I just found the thickest stuff that could be ironed on at Joanns or Walmart. I stitched around the inside hole of the washer so the pellon wouldn't come off with wear. Also, I stitched a line across the top and sewed the button on before I sewed it on the page.
I tried to sew on the baskets with a little give so you could put clothes in it because the pages I sewed it to were pretty stiff.
For the clothesline: The plastic clothes pins are from the party favors aisle at Walmart. I threaded a wire through the hole in the wire part of the clothes pin, poked the wire through a hole I made and then bent it over in the back and bartacked the wire on. The microsuede washer was a fairly easy cutout with little sew on snap to keep it closed. I had to used to colors leather offered, so yellow was the colors basket.